This homemade Ice Cream Cone is a nostalgic treat as well as being surprisingly crispy! Cooking the batter thin creates a pliable wafer that hardens instantly, which along with the hint of vanilla adds a sweet, buttery snap to this cone that is so much better than the boxed kind.
Jump to RecipeIce Cream Cone Recipe Ingredients
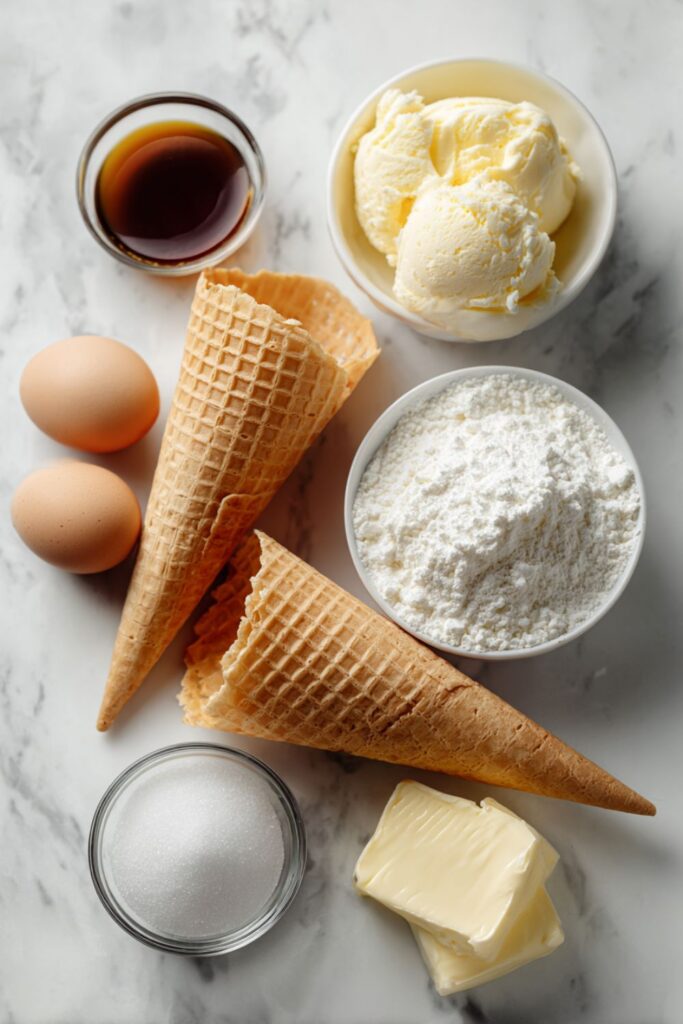
- For Sugar Cones (Stovetop Method):
- 2 large egg whites
- 1/2 cup superfine sugar
- 3 tbsp whole milk
- 1/2 tsp vanilla extract
- Pinch of salt
- 2/3 cup all-purpose flour
- 2 tbsp unsalted butter, melted
- For Waffle Cones (Waffle Iron Method):
- 1 egg
- 1 egg white
- 1/4 tsp salt
- 1/4 cup + 1 tbsp superfine sugar
- 1/2 cup + 2 tbsp all-purpose flour
- 1/4 cup unsalted butter, melted
- 2 tbsp whole milk
- 1 tsp vanilla extract
- Optional:
- Melted semisweet or dark chocolate (for dipping)
How To Make Ice Cream Cone Recipe
- Whisk the batter: In a medium bowl, whisk together all the ingredients for your chosen cone type (egg/whites, sugar, milk, vanilla, salt, flour, and melted butter) until completely smooth. Note: Sugar cone batter will be thicker; waffle cone batter should rest for 5 minutes before cooking.
- Cook the base:
- Stovetop: Lightly spray a cold non-stick skillet. Pour in 2 1/2 tablespoons of batter and spread it into a very thin, even circle. Cook over medium heat for 4–5 minutes until golden, flip carefully, and cook 1–2 minutes on the other side.
- Waffle Maker: Pour 3–3 1/2 tablespoons of batter into the center of a preheated cone, pizzelle, or waffle maker. Close the lid and cook for about 4 minutes until deep golden brown.
- Shape them fast: Immediately remove the hot disc and lay it on a clean kitchen towel. Place a cone roller (or cone mold) at the bottom edge. Roll the disc quickly and tightly around the mold. Press the seam side down firmly on the counter and hold for 1–2 minutes until the cone cools and hardens.
- Dip & cool: Allow the cones to cool completely on a wire rack. For an extra treat, dip the tips or the rims in melted chocolate and let them set on parchment paper.

Recipe Tips!
- Speed is Life: You have about 10-15 seconds before the cone hardens and becomes brittle. Roll it the instant it leaves the heat. If you wait, it will crack instead of curling.
- Superfine Sugar: Use superfine (caster) sugar if possible. The granules are smaller and dissolve faster in the batter, creating a smoother texture without the grittiness that regular granulated sugar can sometimes leave.
- The Seam Seal: The most common failure point is the bottom hole. When rolling, make sure the tip is tightly pinched. If there is a hole, plug it with a mini marshmallow or a drop of melted chocolate before adding ice cream!
- Towel Technique: The waffle will be scorching hot coming off the iron. Using a clean, thin kitchen towel to help you roll protects your fingers from burns while ensuring a tight wrap.
What To Serve With Ice Cream Cone Recipe?
This Ice Cream Cone Recipe is obviously begging for a scoop! A classic Vanilla Bean Ice Cream lets the flavor of the homemade cone shine, but a rich Chocolate Fudge Brownie ice cream is a decadent pairing. For a fruitier option, fill it with a tangy Raspberry Sorbet or Strawberry Gelato! You can also crumble broken cones over yogurt or pudding for a crunchy topping if your rolling technique fails!

How To Store Ice Cream Cone Recipe
- Room Temp: Store cooled cones in an airtight container or zip-top bag at room temperature for up to 3 days. Humidity is the enemy, so keep them dry.
- Re-crisp: If the cones go soft, stand them upright on a baking sheet and bake at 300°F (150°C) for 5-8 minutes to dry them out again. Let cool to harden.
- Freeze: Do not freeze the empty cones, as the moisture in the freezer will make them soggy and chewy.
Ice Cream Cone Recipe Nutrition Facts
- Calories: 120 kcal
- Fat: 5g
- Carbohydrates: 18g
- Protein: 2g
Nutrition information is estimated per cone.
FAQs
It makes life easier, but you can make a DIY mold using stiff cardboard wrapped in aluminum foil. Just ensure it is a tight cone shape.
Yes! Instead of rolling, drape the hot waffle disc over the bottom of an upside-down glass or muffin tin. Press the sides down gently to create a scalloped bowl shape.
If they don’t harden, they likely weren’t cooked long enough or were too thick. The batter needs to be spread very thin and cooked until a deep golden brown to evaporate the moisture.

Ice Cream Cone Recipe
Course: DessertCuisine: AmericanDifficulty: Easy8
servings10
minutes20
minutes120
kcalCrispy, sweet, and buttery homemade cones that are better than anything from a box. Whether made on the stovetop or a waffle iron, they add a special touch to dessert night.
Ingredients
Egg/whites
Sugar (superfine)
Milk, butter, flour
Vanilla extract
Salt
Directions
- Whisk batter ingredients until smooth.
- Pour onto skillet or iron; spread thin.
- Cook 4-5 mins until golden brown.
- Remove and roll immediately around mold.
- Hold seam down for 1 min to set.
- Cool and fill with ice cream.
Notes
- Work fast—the cones harden in seconds!
- Plug the bottom with chocolate to stop drips.
- Use a towel to protect fingers from heat.